2. Collaborative Organization Units (COUs)
As a collaboration grows in size, it may be useful to create various structures to allow for delegation of person management operations and representation of organizational hierarchy. COmanage supports this through the concept of Collaborative Organization Units (COUs), or COUs. COs can support one or more COUs.
Collaborative Organizations Units (or COUs ) allow you to define an organizational structure within a CO. While many organizations have natural sub divisions within them, the reason that you would divide your CO into COUs are because there are differences across your CO that necessitates different policies in one or more of the following:
- How individuals join and/or leave
- Differing rules about how applications get provisioned or deprovisioned
- Who manages person membership and privileges
- The information stored or used about members
If your collaboration–a single entity with common goals–has unique requirements among the different groups and/or departments regarding how participants will join those parts of your collaborations, then, you have a CO that contains COUs. If you have only one common set of policies that define how individuals are added or removed from the CO, then you probably do not have COUs even though you may have groups for simple access control.
COUs may also be used to represent recognized groups of collaborators like departments, divisions, projects; or they may be related to the privileges that those in the group may have, for example, alumni or parents.
In all cases, the primary purpose of a COUs , however, is to allow for delegation of person management operations.
COUs can be organized in a hierarchical structure (with another COU as a parent) or flat structure (with the CO as its parent.
Some examples:
A University Example
| field | COU #1 | COU #2 |
|---|---|---|
| Name | Main university | Guests |
| Description | A sub-unit containing the people and policies related to the main university. This is a top-level sub-unit. | An organizational unit for managing groups of users that are not directly a part of the university. |
| Parent COU | [blank] | [blank] |
A Virtual Organization Example
| field | COU #1 | COU #2 |
|---|---|---|
| Name | Researchers | Administrators |
| Description | A unit containing the people who are researchers. | A unit containing the people who are administrators. (These unit likely would be maintained by different people) |
| Parent COU | [blank] | [blank] |
CO Person Roles
a.k.a., associating CO Persons with COUs
Any CO Person in the CO can be part of any of the COUs in the CO. This connection happens through an object called a CO Person Role .
The attributes (information) stored in the CO Person Role object typically include
- Link to the associated CO Person who is connected to the COU
- Link to the person who is sponsoring the CO Person . Sponsors are usually used in relation to guest systems. We’ll talk more about sponsors when we talk about enrollment workflows.
- Status
- Role-specific information about the person
- affiliation (eduPerson)
- organization, department, & title
- List of physical addresses / phone numbers
CO Persons
can have any number of CO Person Roles, usually one for each COU that the person is part of. At least one Role must be specified for the individual to be able to sign into COmanage.
CO Person Role Status
As with CO Persons , each CO Person Role has a status related to it. The list of possible values is identical to that we reviewed in the previous lesson.
When a CO Person is connected to one or more CO Person Roles , the status of the CO Person is calculated from that of the associated Roles based on the “most preferred” status. “Most preferred” is defined with the Active statuses as the highest preference, followed by the Expired ones, followed by the Invitation statuses (with invitations that have gone the furthest through the invitation process having a higher preference.)
Administrator Roles
COU Administrators
COU Administrators can be defined for each COU , giving them the ability to perform lifecycle management operations on the CO Persons who have CO Person Roles associated with the COU that they manage.
Hands on - The organization model - COUs

We will move back to our breakout groups for 10 min. The organization that we are using for our example use cases likely can benefit from COUs. How might you separate the organization into COUs?
For each COU that you identify, include a name, description and parent COU (if applicable) in the Etherpad.
When we come back together, we will review the choices that you made, and will decide what COUs we will create in Comanage for our future exercise.
After the workshop
[5 min]
Hands on - Create COUs in COmanage
Sign into COmanage
- Using the credentials you specified as part of the COmanage setup (or the CO Administrator that you established in the last section), sign into the system.
- Navigate to your CO . If necessary, select your CO by selecting Collaborations from the menu on the left, and then selecting your Collaboration.
Create a COU
REQUIRED ROLE: CMP Administrator OR CO Administrator
-
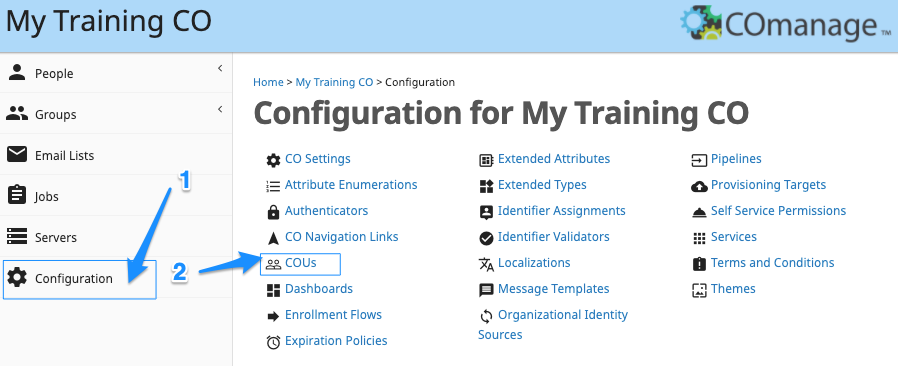
In the menu on the left, click on the Configuration link to see the list of customizations that you can make. Click on the link labeled COUs to see the list of COUs for the CO .
-
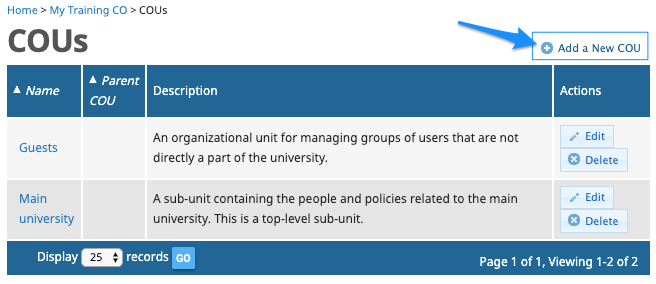
Click the Add a New COU link above the table to create a new COU. Fill in the form using the values that you included on your worksheet and click the ADD button to add the COU .
-
Repeat for the second COU . When you return to the COU List, you will see the two COUs that you created. They can be edited from this page if needed.
Establish a COU Administrator
Each COU can have its own COU Administrator . Manually designating the administrators is a process similar to the one that we followed to create a CO Administrator .
-
Ensure that you are signed in and are looking at the CO that you created. From the COU list page, you can use the breadcrumb links near the top of the screen to navigate back to your CO. There are two common paths for manually designating COU Administrators . We will use a different process for each of the COUs that we created.
-
Method 1: From the CO Person
-
From the menu on the left select People > My Population to see the list of CO Persons in your CO
-
Click the Edit button next to the name of the person you set up in the previous lesson.
-
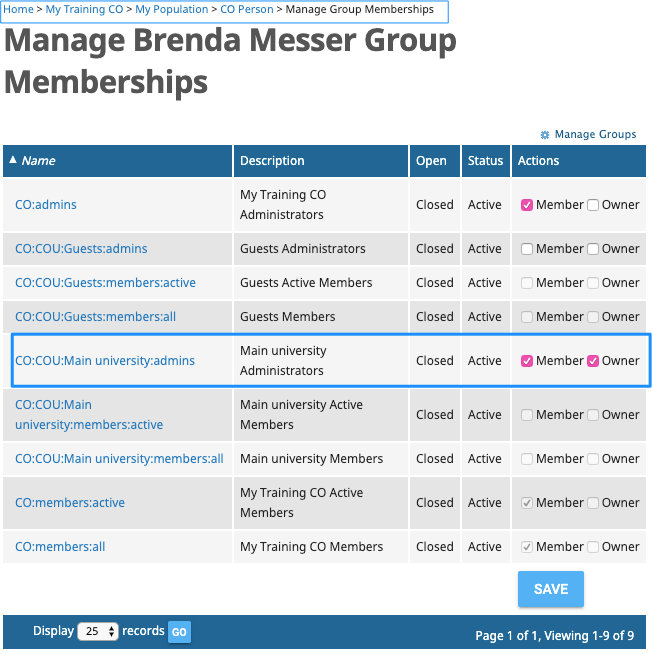
Scroll to the Groups section, and click the Manage Group Memberships link. On the list of groups you will now see admins, active, and all groups for each of your COUs as well as those for the full CO
-
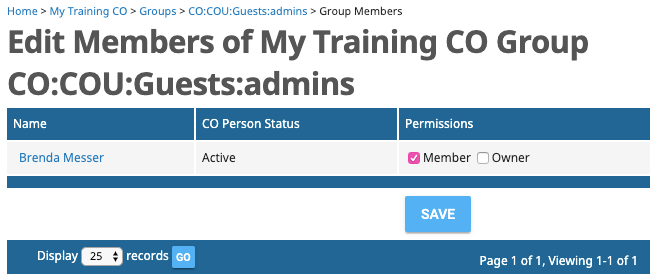
Make this person a member and also the owner of the admin group for your first COU - check both the Member and the Owner checkboxes for (only) the first COU that you created. Click the SAVE button to save these changes.
-
-
Method 2: From the groups list:
-
From the menu on the left, select Groups > All Groups
-
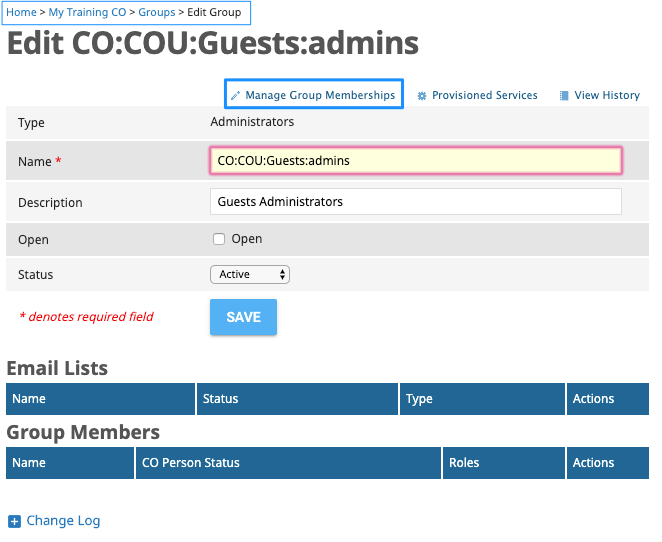
Click the Edit button for the admin group for the second COU that you created to display the group management page.
-
Scroll to the bottom of the page to see the list of current group members.
-
Click at the top of the page the Manage Group Memberships link to see a list of people that you can add to the group.
-
From the group membership management list, check the “Member” permission to make this person a member of the admin group for the second COU that you created. Click the SAVE button to save this change.
-
CONGRATULATIONS!! You have just created and configured your first COUs.
Terminology & resources
See resources and definitions for COmanage-specific terminology in this lesson.