Introduction to the Azure Cloud Console
Contents
Introduction to the Azure Cloud Console#
Overview
Teaching:
Exercises:
Questions:
How do I find things in the web console?
How do I access the cloud through the command line?
Objectives:
Login to the Azure web console
Find and verify important information about your cloud environment.
Find and open the Cloud Shell
The Who, What, and Where of the Cloud#
Before we get started we must first define, and find, a few key pieces of information about your environment that will be used throughout this lesson. This information is also important to ensure that this information is what you expect, otherwise you may use the wrong account or run or store things in the wrong place. It is important to be clear about these terms as they are often different in other cloud providers. We provide a glossary of Azure terms for your reference.
Accounts (Authentication and Identity) & login#
The (Azure) Account is the identity used to access the Azure web console and is in the form of an email address and is associated with an individual (the who is you!). This is typically the account you use to access Azure services associated with your institution and not your personal account. We will now login to the Azure web console and verify our account.
Login to the web console with your (Azure) account by going to https://portal.azure.com/
Fill in your username and password (assigned to you in the an email from CLASS or perhap from your institution).
Find your user/account under the “Avatar” in the top right corner of the console (see number 5 below).
You are now logged in. Welcome to the first step of your cloud journey!
Exercise
Take a few moments to ask yourself the following questions:
What account are you currently using in the Azure Cloud web console?
Are you logged into any other accounts?
How do you know which account is being used?
If you are not currently using the correct account, switch to it.
Subscriptions#
Click on the Directories & Subscriptions button in the console (number 4 below). Verify that you are in the right Active Directory and Subscription (For more information on Active Directories and Subscriptions, see the glossary of Azure terms link above).
Exercise
Take a few moments to ask yourself the following questions:
What is the name of the Subscription you are currently using in the Azure web console?
Do you have multiple subscriptions?
How do you know which subscription you are currently using?
If you are currently not using the correct subscription for this lesson, switch to the correct one.
Services#
The web console is used to control and observe the cloud from the browser. It should only be used for simple and one-time tasks, exploring new services, accessing documentation, or for monitoring and debugging resources in the cloud. Programmatic control through the console (cloud shell), programming languages (for example Python), and other automation tools should be used for day to day activities to make the most out of the cloud and to help with the reproducibility of research and teaching.
The Navigation Menu (number 1 below) is used to navigate to the various products, which are also called services.
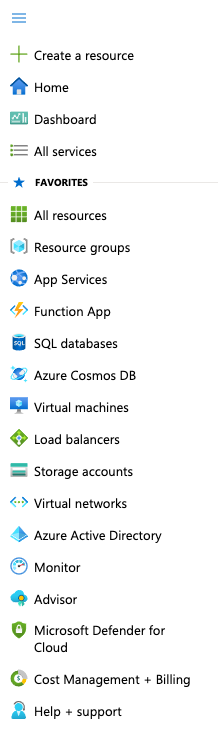
Click on a product to navigate to the product page
Click the hamburger again to hide the Left Sidebar.
All the different products and services are the “What” of the cloud. We will start with compute, called Azure VM in the next Episode.
Exercise
Take a few moments to navigate to a few key services.
Navigate to the “Virtual Machine” service in the Left Sidebar menu.
Navigate to “Storage Accounts” service in the Left Sidebar menu.
Everything Else#
If you did not already notice, every page on the Azure web console has a blue navigation bar at the top of the page. This can be used to quickly navigate to the page you need.
The top of your screen should look very similar to the following when you log in to the Azure console. Next, let’s take a closer look at some key concepts and components of the Azure console.

1. Navigation Menu (often called the hamburger) : If you click on the hamburger (three horizontal lines) you will get a dropdown menu and see a list of services that are offered by Azure. Currently, Azure has over N services ranging from compute to machine learning to networking to data storage. The list grows frequently!
2. Search bar : You can also use the search bar to find a particular service or offering that you are interested in. Cloud vendors have proprietary vocabulary or jargon, so it is often useful to be aware of those as you start exploring more in your cloud adoption journey. Internet2’s CLASS Core documentation provides a basic list of vendor specific cloud terminology. For example, if you wanted to provision or utilize a “virtual server”, you can try using the search bar to search for “Virtual Machines”. As you start typing the words starting with “V” will auto fill. Choose Virtual Machines from the options displayed.
3. Cloud Shell : The cloud shell button invokes an interactive shell environment for either bash or PowerShell. The first time you invoke cloud shell you will also creare persistent storage specifically for cloud shell. The cloud shell comes with linux tools like bash, sh, & dig as well as the Azure CLI. Cloud shell also has editors like VIM and emacs, and tools like git, make, and configuration tools like ansible & terraform already installed. Language support for python, go, java, & PowerShell are also preinstalled. Azure Cloud Shell runs on Ubuntu 16.04 LTS with persistent storage.
4. Directories & Subscriptions : This button will show the current Subsciption and Active Directory (cover later) associated with your account. The Subscription is your billing account. Using this dropdown to verify that are using the right subscription.
5. IAM Username and Organization : The menu bar on the console also lists your username and the current organization that you are logged into. IAM is short for Identity and Access Management. Identity is a mechanism to authenticate users (e.g. password) and Access is a mechanism for authorizing what kinds of services users have access to. In the creation of an IAM user, the administrator (overlord) of the account assigned a particular permission scope (in AWS this is known as roles) to control access to a particular set of services and also assigned a password to authenticate user login. IAM is a key component in managing security on the cloud.
Open the Cloud Shell#
The Cloud Shell is an easy way to access Comand Line Interface (CLI) commands in a web browser. Under the hood Cloud Shell is Common Base Linux Delridge (CBL is a free and open-source, Linux distribution that Microsoft has developed) OS running in a container with 5GB of persistent storage and a lot of other useful tools (git, jq, Docker, etc.) installed by default. To use the Azure Cloud Shell:
Open up a Cloud Shell by clicking on the cloud shell icon (greater than sign followed by underscore) on the blue bar just to the right of search window. On first launch, Cloud Shell prompts to create a resource group, storage account, and Azure Files share on your behalf. This will open a cloud shell at the bottum of your browser window. You can choose a bash shell or Power shell.
If you want a new cloud shell in a different window, click the new cloud shell button (file icon with + in upper right corner) on the cloud shell menu bar. This will create a new cloud shell window tab. Note: you may need to allow popups or enable popups for this website depending on the browser you use. You can also pull up the tab to increase the shell screen size.
To quit cloud shell type exit at the prompt.
To use the Cloud Shell:
Open up a Cloud Shell by clicking on the Cloud Shell icon in the right side of the top blue bar (number 3 above).
The first time you open cloud shell you will be prompted for the following:
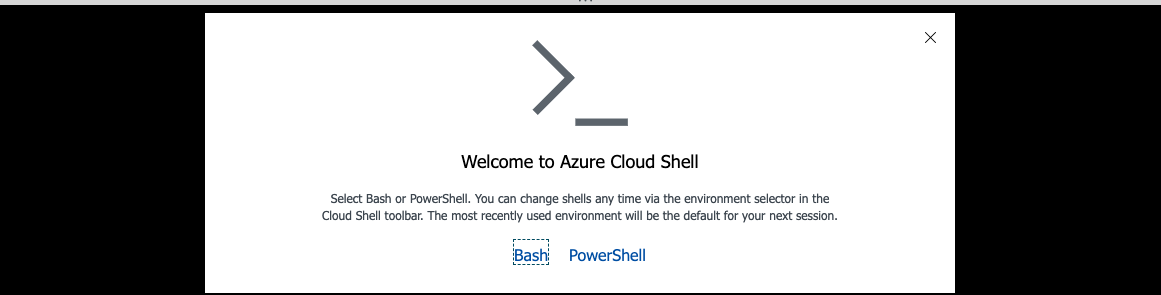
Choose bash to continue.
Then it will ask you to create a storage account for persistant storage for your cloud shell experience.
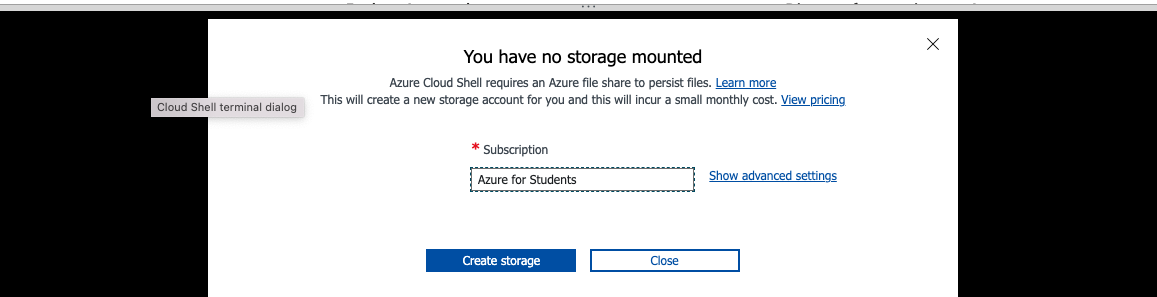
Click create storage (The storge will encurre a nomial fee)
Once the Cloud Shell is open and has initialized, you should see “Welcome to Azure Cloud Shell”.
Click the middle box icon on the right side of the Cloud Shell bar to maximize the screen. You can find the correct icon by hovering over the icons to see their names.
Note: You can open the Cloud Shell in a new tab by clicking on the Open new session icon (looks like a box with a “+”) in the middle of the Cloud Shell bar.

You will notice that in the upper left corner of the cloud shell there is a pull down menu. This should be set to bash (The other option is PowerShell). We will now prepare for the next lessons by creating an ssh key.
Now we will create a ssh key pair to use with some of the other lessons (e.g. we need a ssh key when creating a VM in order to login securely).
At the $ prompt, enter ssh-keygen and follow the prompts.
$ssh-keygen
Generating public/private rsa key pair.
Enter file in which to save the key (/home/john/.ssh/id_rsa):
This prompt is asking you to create a .ssh directory in your home directory and generate ssh public/private keys named id_rsa.pub/id_rsa (default) respectively.
Press enter to continue to create the key. You will see another message asking you for a passphrase, similar to the following:
Generating public/private rsa key pair.
Enter passphrase (empty for no passphrase):
Here you should enter a passphrase (a series of words) to protect the key. You will be asked to re-enter the passphrase as shown below:
Enter same passphrase again:
After successfully retyping the passphrase the key generation process will continue showing a similar message as follows (the fingerprint and art will look different):
Your identification has been saved in /home/<username>/.ssh/id_rsa.
Your public key has been saved in /home/<username>/.ssh/id_rsa.pub.
The key fingerprint is:
SHA256:D9yj1nZEUigahirvjkIFoCP7RfjDu67Ku88M7nHQftI learner@cs-748001990186-default-boost-r9phq
The key's randomart image is:
+---[RSA 2048]----+
|o    .     ..    |
|.. .. o . ..     |
|+ o... o .. .    |
|ooo=  .. . o     |
|.+..=   S o .    |
| o+..o   = o     |
|.+.+.E  o + .    |
|+.B o. . . .     |
|=O**o            |
+----[SHA256]-----+
The ssh key generation is now complete. You will only need to do this once for your account. Later during the VM create proces you will be asked to Cut & Paste the public key into a form.
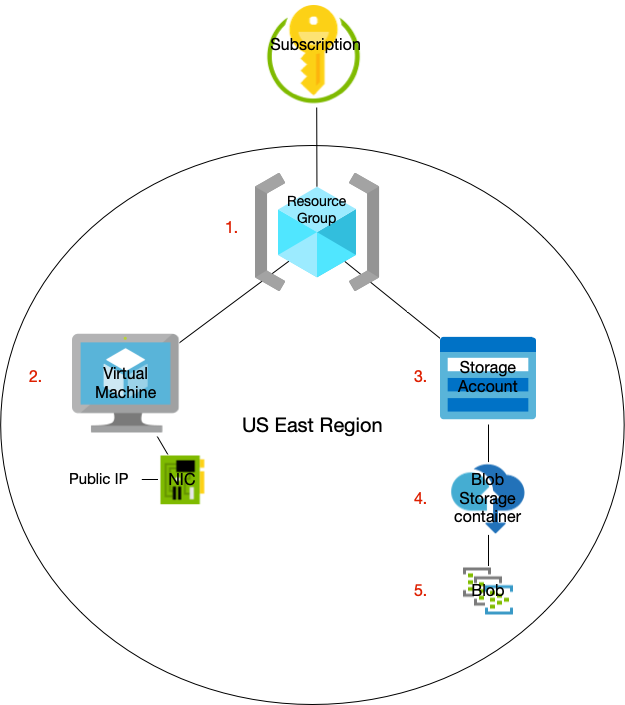
Overview of what we will create#
We are now ready to move on with the rest of the Azure essentials lessons. Here is an overview of what we are
going to do. First we will create a Virtual Machine (VM) and in doing so create a Resource Group. Then we will
create a Storage Account and in that a blob storage container. After that we will create a blob and upload it to
the blob contaioner.
Exercise#
Before we move on, do the following:
Double check that you are in the correct account that you will be using for this lesson.
Take a moment to reflect on the “Who, What, and Where” of the cloud. Why is this important?
Now let’s move on the to next lession