Introduction to Cloud Compute (Google Compute Engine)
Contents
Introduction to Cloud Compute (Google Compute Engine)#
Overview
Teaching: 30 min.
Exercises: 6 min
Questions:
How do I create my own computer in the cloud?
Objectives:
Navigate the Google Compute Engine product and terminology.
Allocate a virtual machine in Google Compute Engine.
Choose a machine type based on the application.
Use the cost estimator for Google Compute Engine.
Learn what a service account is and how they are used.
Learn how to connect to a virtual machine using ssh in the Cloud Shell with the web console.
Drew, after working with a Research Computing and Data (RCD) facilitator, has decided to start their cloud journey with compute, specifically a Virtual Machine, to process data in the cloud with a large and powerful machine to do the analysis.
Google Compute Engine#
To learn more about the Google Compute Engine product we will use the web console to create, explore, and destroy a Virtual Machine. The ability to quickly create, explore, and then discard resources in the web-console is a powerful tool to learn more about a product. After an initial exploration with the web-console, programmatic access using scripts or configuration management systems should be used.
Unfortunately, the terminology used for cloud computing differs from one commercial cloud provider to another. Google Compute Engine uses the term VM instance to refer to a running virtual machine, image for the boot disk containing the operating system, and disk for the writable storage used for a running VM Instance.
We now take Drew through the process of creating a Google Compute Engine VM instance.
Allocate a VM Instance#
We will first create an VM instance with defaults to explore the Google Compute Engine product.
To create a VM Instance we do the following:
Click Navigation Menu -> Compute Engine (under Compute) -> VM Instances -> +Create Instance (just under the blue bar) to open the Create an instance page.
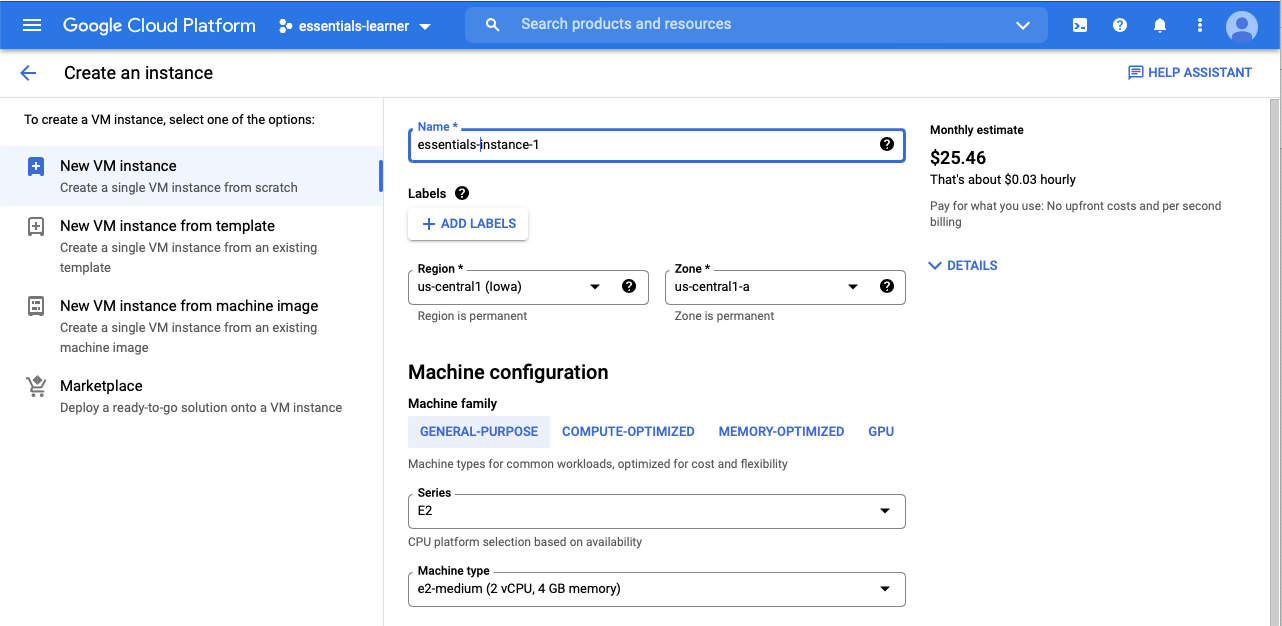
In the New VM instance tab on the left (selected by default) configure the VM instance as follows:
For Name, enter a unique name for the instances (example: “essentials-test-1”)
For Region leave the default or select your “home” region. The region is the physical location where your data will reside. Your “home” region should be close to your work and should be the region you use most of the time.
For Zone leave the default (note how the name is constructed and that it is a separate data center) some zones have different capabilities.
In the Machine configuration section:
For Series select E2 (default). The other options are for types of machines.
For Machine type select e2-medium (default). Note that it shows the size of the VM in parentheses.
In the Identity and API access section note that for the Service Accounts -> Service account option that the Compute Engine default service account is selected. This allows the VM Instance to access resources in the project. Leave the “Access scopes” on the default “Allow default access”. Note: the “Allow full access to all Cloud APIs” allows everyone on the VM to access and edit all resources in the project.
Leave the remaining options as default.
Note the Monthly estimate in the right side panel. This is only for running the VM instance and does not include other storage, networking, compute, and other charges that may occur by running software. Click Details show a breakdown of the VM instance only costs.
Exercise
Find the most expensive VM. DO NOT actually create!
Find the least expensive VM.
Select
e2-medium
Finally, click Create to create the VM Instance (allocate the resource).

More on Security (Optional)#
Everything in the cloud requires permission (authorization). Ordinary we would configure and check security first but in the case of exploring products it is often easier to do things out of order. We noted that the VM instance was created with the Compute Engine default service account, and if the “Allow full access to all Cloud Api’s” scope is enable, then everyone on the VM has access to all the resources in your project.
In the case of Drew, this is useful since they will be storing results of the analysis in Cloud Storage and the VM that will be doing the processing will need to have access to the storage. This is the mechanism that allows this.
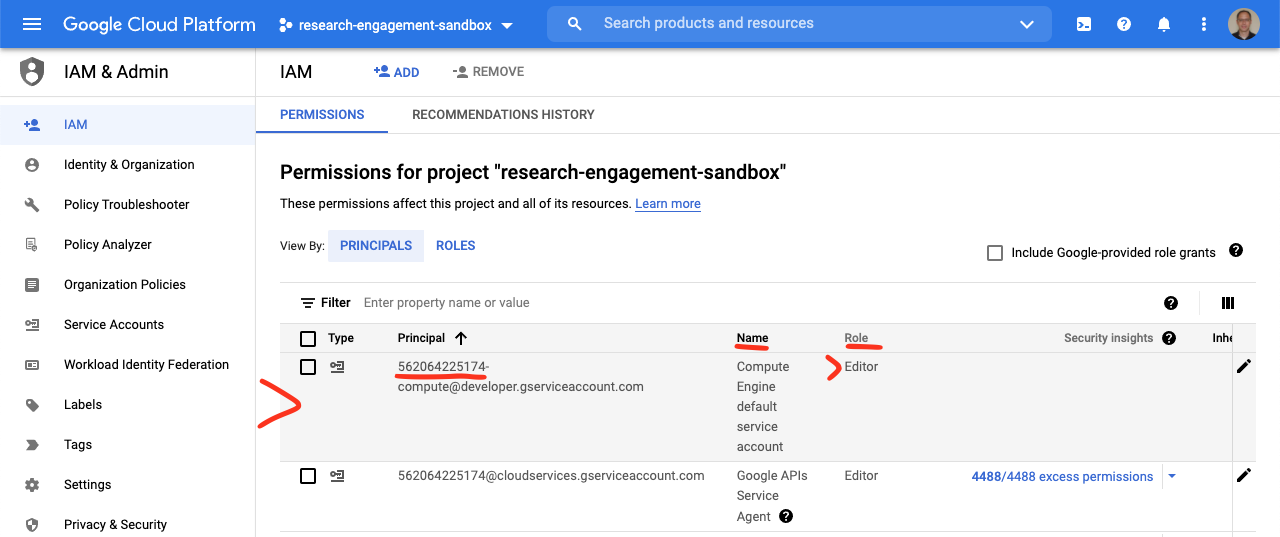
Specifically, we are interested in verifying what permissions that the Compute Engine default service account has for your VM instances . To do this navigate to the IAM page (Navigation Menu -> IAM & Admin -> IAM -> Permissions tab -> View By: Principals tab)
Note: There is a powerful filter box to limit the permissions shown.
In the Name column you should see a row with Compute Engine default service account. Here you should see the Editor role in the Role column. A role is a collection of permissions managed by Google or someone else. The Editor role for a project will allow a VM instance to modify resources in the project. The principal for the Compute Engine default service account should start with the Project ID of your project. It is possible to create a custom service account with the appropriate roles for the VM Instance.
There are three important pieces of information that work together to form the IAM policy. The permission (role), the identity (principal or member), and the resource (project).
There is one additional tool that is used, scope. Scope describes the products that are accessible by an identity and is a simple way of limiting access to products.
When we previously created the virtual machine we selected the default scope, which limits what products the virtual machine has access to. In other words, these scopes can only limit what a virtual machine instance can do, it can not add any permissions that are not already granted to the service account through IAM. In general, access should be managed through IAM policy, not scope.
Track VM Instance Creation#
We can track what is going on in our project by following the VM instance creation by examining at the project activity page on the project dashboard.
To view the project activity we do the following:
Navigate to the project Dashboard by clicking on “Google Cloud” on the left side of the top blue bar and clicking the “Dashboard” link.
Select Activity tab just below the top blue bar.
Look for the row with Create VM on the top of the table. This shows that the VM Instance was created.
Expand the detail by clicking the down arrow on the right side of the row. You can see what identity created the VM and the name. The rest of the information details the initial settings that you configured when creating the virtual machine. The details are not really important at this time, just know they exist.
By default, this information cannot be deleted for security and auditing reasons.
Note: that the activity is on the project, not on your account.
Find the VM Instance#
Now lets find and connect to the VM Instance.
Navigate to the Google Compute Engine page by clicking Navigation Menu -> Compute Engine (under Compute) -> Instances.
Find the VM instance you just created. You can use the filter to find a VM instance if there are a lot of them.
Click on the VM instance name to open the VM instance details (it will display as a hyperlink when you hover over the VM instance name).
Navigate to the dashboard and you will see Compute Engine in the resources card. You can click on this to quickly navigate to the compute engine page.
Connect to the VM Instance#
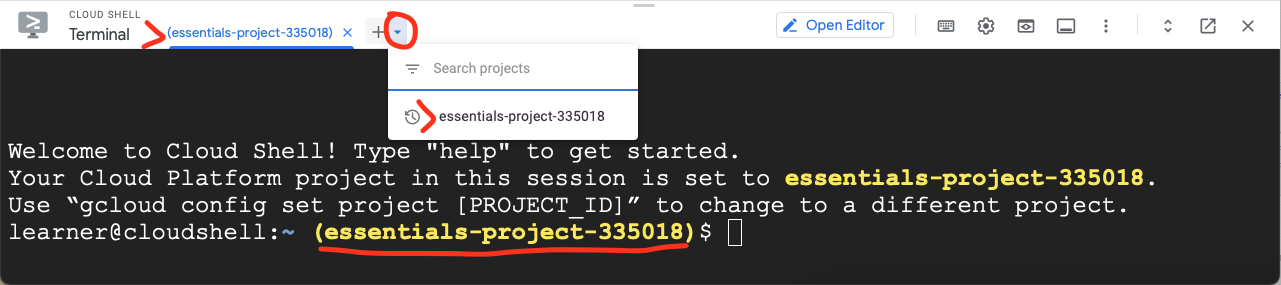
To connect to the VM Instance we will use the cloud shell in the web console. Open up a shell by clicking on the Activate Cloud Shell icon in the top blue bar if it is not already open.
We first verify that the cloud shell is using the correct identity and project id by looking at the welcome message and the prompt. If your shell does not show a project you will have to use the little “Down Arrow” next to the “+” to create a new tab to select the correct project.
To connect to the VM instance we enter the following command in the cloud shell:
gcloud compute ssh essentials-test-1
If you have not used the cloud shell to connect to a VM Instance before you will probably be asked to create a new ssh key. The Compute Engine will use this key to allow you to access the VM instance in a secure manner. If this is the case you will see a message similar to the following:
WARNING: The private SSH key file for gcloud does not exist.
WARNING: The public SSH key file for gcloud does not exist.
WARNING: You do not have an SSH key for gcloud.
WARNING: SSH keygen will be executed to generate a key.
This tool needs to create the directory [/home/learner/.ssh] before
 being able to generate SSH keys.

Do you want to continue (Y/n)?
Press enter to continue to create the key. You will see another message asking you for a passphrase, similar to the following:
Generating public/private rsa key pair.
Enter passphrase (empty for no passphrase):
Here you should enter a passphrase (a series of words) to protect the key. You will be asked to re-enter the passphrase as shown below:
Enter same passphrase again:
After successfully retyping the passphrase the key generation process will continue showing similar message as follows (the fingerprint and art will look different):
Your identification has been saved in /home/learner/.ssh/google_compute_engine.
Your public key has been saved in /home/learner/.ssh/google_compute_engine.pub.
The key fingerprint is:
SHA256:D9yj1nZEUigahirvjkIFoCP7RfjDu67Ku88M7nHQftI learner@cs-748001990186-default-boost-r9phq
The key's randomart image is:
+---[RSA 2048]----+
|o    .     ..    |
|.. .. o . ..     |
|+ o... o .. .    |
|ooo=  .. . o     |
|.+..=   S o .    |
| o+..o   = o     |
|.+.+.E  o + .    |
|+.B o. . . .     |
|=O**o            |
+----[SHA256]-----+
The ssh key generation is now complete. This will only happen once for your account and you will start here on future connections.
At this point the command will attempt to connect to the VM Instance and will ask the following question:
Did you mean zone [us-central1-a] for instance: [essentials-test-1] (Y/n)? n
Answer “n”.
The command will now configure the instance to allow your ssh key and connect to it.
No zone specified. Using zone [us-central1-a] for instance: [essentials-test-1].
Updating project ssh metadata...working..Updated [https://www.googleapis.com/compute/v1/projects/class-essentials-test-1].
Updating project ssh metadata...done.
Waiting for SSH key to propagate.
Warning: Permanently added 'compute.74517428106645607' (ECDSA) to the list of known hosts.
Enter passphrase for key '/home/learner/.ssh/google_compute_engine':
Once connected you will see the machine login banner and prompt similar to the following:
Linux essentials-test-1 4.19.0-17-cloud-amd64 #1 SMP Debian 4.19.194-3 (2021-07-18) x86_64

The programs included with the Debian GNU/Linux system are free software;
the exact distribution terms for each program are described in the
individual files in /usr/share/doc/*/copyright.

Debian GNU/Linux comes with ABSOLUTELY NO WARRANTY, to the extent
permitted by applicable law.
learner@essentials-test-1:~$
Congratulations you have now created a VM Instance and connected to it.
Feel free to interact with the machine for a while and type
exit
when you are done.
Delete the VM Instance#
Danger
This will destroy the VM instance and and ALL the data in it! You cannot undelete an instance!
Now that we have made that clear, we will now complete the resource life-cycle by deleting the VM Instance we just created. First, try to do this on your own.
Exercise
Try to delete the VM instance on your own
Try to follow the process we just learned (hint: track and list)
To delete a VM Instance:
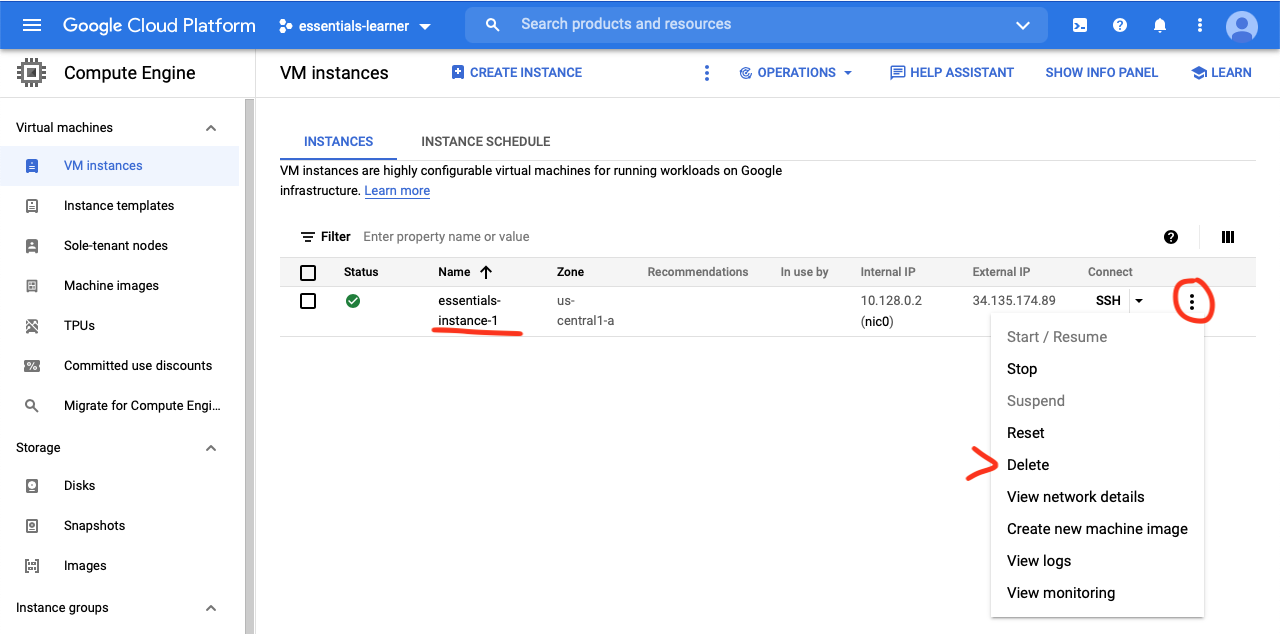
Go to Navigation Menu -> Compute Engine (under Compute) -> Instances.
On the row of the virtual machines click the three vertical dots (kabob) menu and select Delete
Click ‘Delete’ to confirm deleting the instance.
Did you “Follow” the VM instance by looking at the activity page as discussed above?
Since we care about paying for resources we are not using we review our project by visiting the compute engine product and reviewing that we no longer have any VM instances running.
Go to Navigation Menu -> Compute Engine (under Compute) -> Instances and look for your virtual machine. It should be gone!
In a later episode we will show how to easily list all the resources in a project.
References#
Compute Engine Permissions (IAM): https://cloud.google.com/compute/docs/access/iam