Introduction to Google Cloud Storage
Contents
Introduction to Google Cloud Storage#
Overview
Teaching: 20 min
Exercises: 5 min
Questions:
How do I store data in the cloud?
Objectives:
Navigate the Google Cloud Storage service and terminology
Allocate storage in Google Cloud Storage
Find the cost estimator for Google Cloud Storage
Recognize that resources have a “location”
Recognize danger of public access
De-allocate Google Cloud Storage storage
Now that Drew has a basic handle on how to create a virtual machine instance and has played around with it they are now ready to figure out where to store the data. Drew was advised that for storing and sharing data outside a virtual machine instance that Object storage is the first thing to try.
Storage#
There are many storage products and services in the cloud. One of the most common and economic ways to store data in the cloud is to use object storage. In Google Cloud object storage is called Google Cloud Storage, which is similar to the Simple Storage Service, also known as S3, on Amazon Web Services (AWS). For object storage, information is stored as a collection of key-value pairs. This is different to how data is commonly stored on laptops and high performance computing clusters (supercomputers).
Google Cloud Storage#
Unfortunately, the terminology used for object storage differs from one commercial cloud provider to another. Google Cloud Storage uses the terms Bucket and Object. Data is stored in Objects and Objects are stored in Buckets. Objects (data) are stored as a key-value pair, which is similar to a Python dictionary but persistent. Values are stored and retrieved using a unique key and the value can contain any information (more on this later).
We now take Drew through the process of creating a Google Cloud Storage bucket.
Allocate Google Cloud Storage#
Buckets are where objects are stored and have a globally unique name.
To create a bucket we do the following:
Click Navigation Menu -> Cloud Storage (under Storage) -> Buckets -> +Create Bucket (just under the blue bar) to open the Create a bucket page.
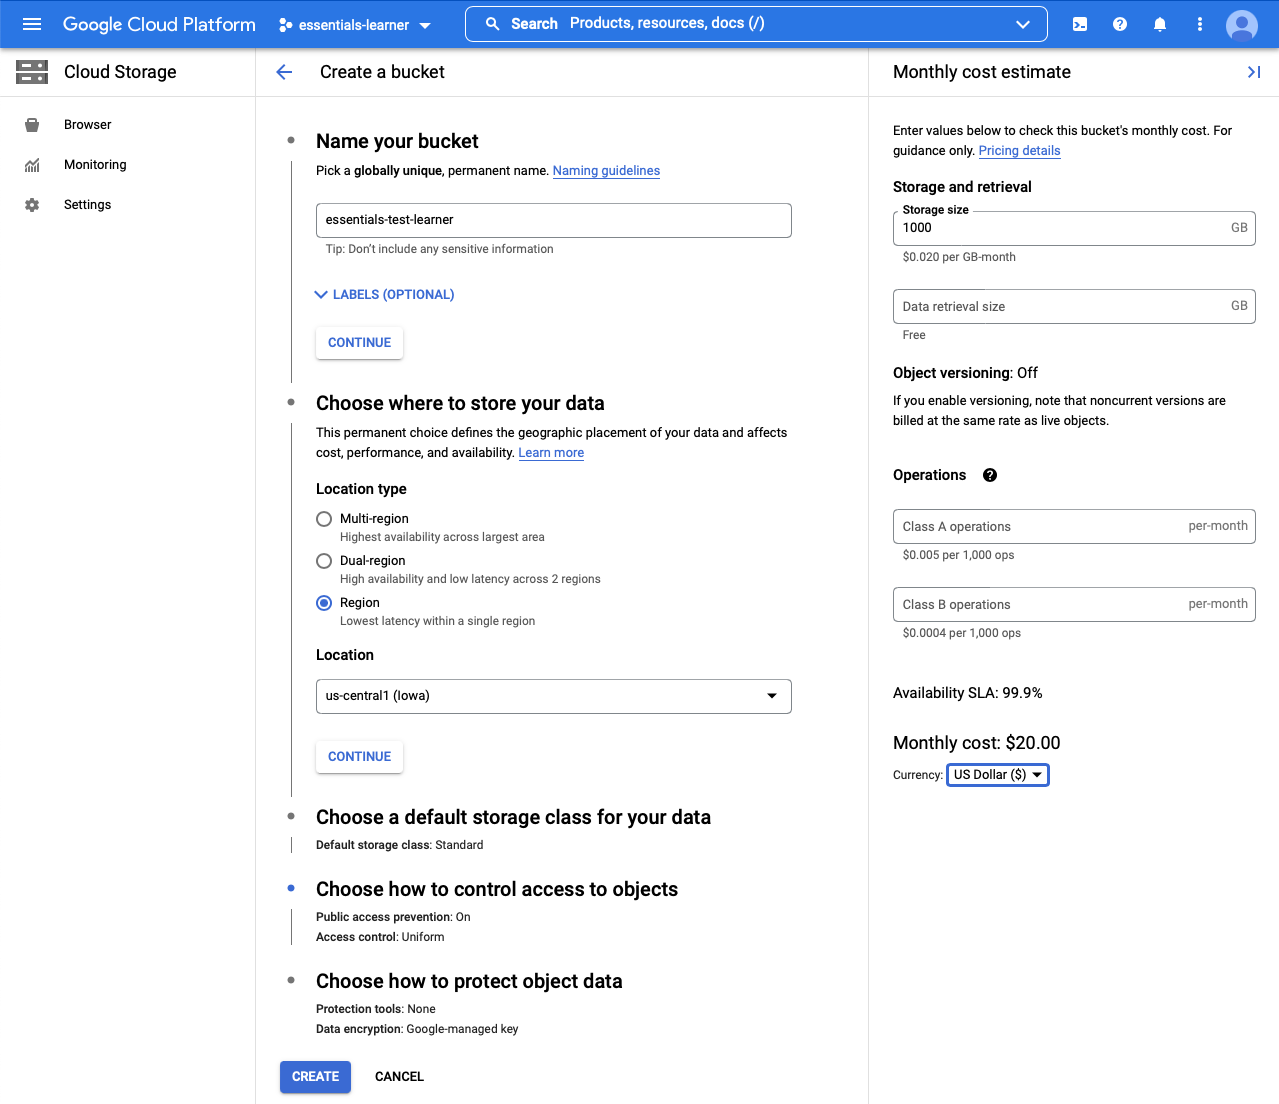
In Name your bucket:
For Name, enter a globally unique name for the bucket (example “essentials-test-myname-2022-01-01”)
Click Continue
In Choose where to store your data:
For Location Type select Region (cheapest and fastest)
For Location leave the default or select your “home” region. The region is the physical location where your data will reside. Your “home” region should be close to your work and the region you use most often.
Click Continue
In Choose a default storage class for your data:
Select Standard (default). The other options are for long-term storage.
Click Continue
In Choose how to control access to objects:
Under Prevent Public Access leave “Enforce public access prevention on this bucket” checked (default). This will try to prevent others from accessing your data.
Under Access Control Select Uniform (default). Uniform permissions are on the entire Bucket. Fine-grained permissions are on the objects.
Select Continue
Note the monthly cost estimate in the right side panel (you may need to open it by clicking the expand button (<|) in the upper right just below the blue bar). This is only for reading, writing, and storing data and does not include networking, compute, and other charges that may occur by using the data.
Storage size is the total amount of data stored. Exercise: Enter 1000 in the storage size box to see how much a TB costs per month.
Data Retrieval is only used for for long-term, non standard, storage.
Operations is the number of “operations” performed on an object, for example reading and writing an object. Storing and accessing many objects require many operations.
Finally, click Create to create the bucket (allocate the resource).
Track the Storage Allocation#
Just as with compute, we will track (follow) the bucket creation by examining at the project activity.
To view the project activity we do the following:
Navigate to the project Dashboard by clicking on “Google Cloud” on the left side of the top blue bar and clicking on the “Dashboard” link.
Select Activity tab just below the top blue bar.
Look for the row with Create Bucket on the top of the table. This shows that the bucket was created.
Expand the detail by clicking the down arrow on the right side of the row. You can see what identity created the bucket and the name. The rest of the information details the initial settings that you configured when creating the bucket. The details are not really important at this time, just know they exist.
Note that the activity is on the project, not the account.
List the Buckets#
Now lets find and examine the bucket. To view a bucket we do the following:
Navigate to the Google Storage page by clicking Navigation Menu -> Cloud Storage (under Storage) -> Buckets.
Find the bucket you just created. You can use the filter to find a bucket if there are a lot of them.
Click on the bucket name to open the bucket details (it will display as a hyperlink when you hover over the bucket name).
Review what is Important#
It is always important to review what is important to you. It may be cost, or keeping the data secure. Later on we will show how to monitor overall costs.
For Drew, we will review that the bucket public access is not public by doing the following:
Go to Navigation Menu -> Cloud Storage -> Buckets
Select the bucket of interest by checking the box next to the Bucket name.
Click the Permissions button just under the blue bar and you should see Not Public in the “Public Access” box that appears. This means that public access prevention is turned on.
You can also see the permissions for the bucket in the bottom of the side bar.
Delete the Storage#
Danger
This will destroy the storage Bucket and and ALL the data in it! You cannot undelete a Bucket!
We will now complete the resource life-cycle by deleting the bucket we just created. Think about the process we did for creating the bucket and follow a similar one.
Exercise
Try to delete the storage bucket on your own
Verify that the storage bucket has been deleted.
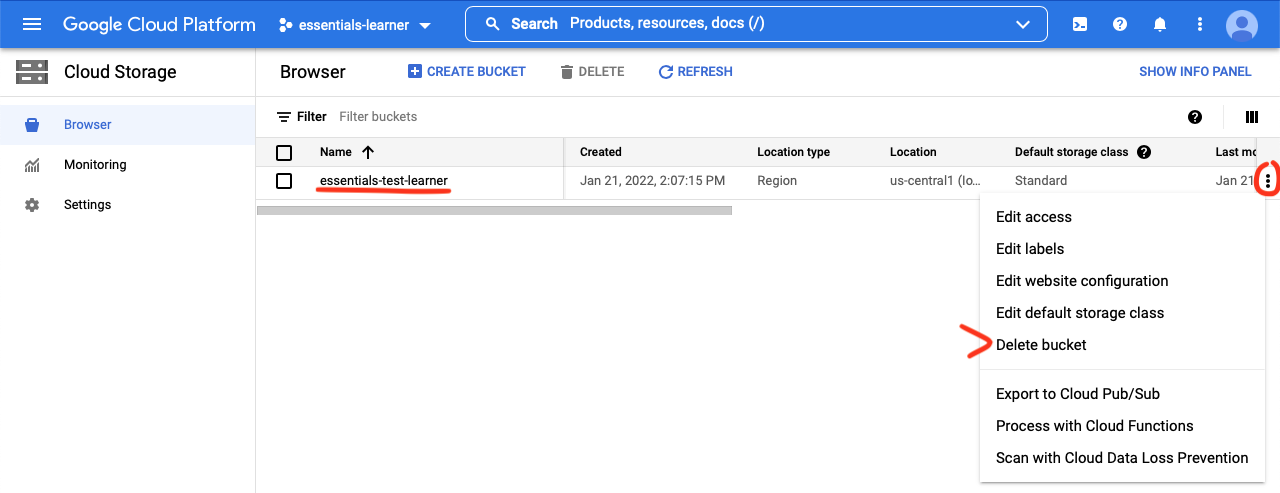
To delete a Bucket:
Go to Navigation Menu -> Cloud Storage (under Storage) -> Buckets.
On the row of the bucket click the three vertical dots (kabob) menu and select Delete
Type the word “Delete” in the text box and click ‘Delete’ to confirm deleting the storage bucket.
Did you “Track” the bucket by looking at the activity page as discussed above?
Since we care about paying for resources we are not using we review our project by visiting the compute storage service and reviewing that we no longer have any Buckets allocated.
Resources in Google Cloud (Optional)#
Even though we only covered the Google Cloud Storage service in this episode, this process can be used for other resources allocated in the cloud. The term resource is used for the “things” that live in a Project, such as compute, storage, and networking and other services. Resources have the following characteristics:
Resources are like “objects” and usually have their own product/service page in the navigation menu.
Resources have many properties (how it is configured), costs, permissions, and almost always belong to a Project.
Resource creation permission is at the parent (Project).
Resources live in a machine somewhere, and usually specify a location (Region and Zone).
Resource creation has limits (Quota) that can be changed (up or down).
Resources usually have multiple charges associated with it (even if they are
$0.00).Resources have a beginning, middle, and an end. Don’t forget the end. Have a plan!
References#
API reference https://cloud.google.com/storage/docs/reference/libraries
Permissions (IAM): https://cloud.google.com/storage/docs/access-control/iam-permissions