Introduction to Virtual Machines (VM) in Azure
Contents
Introduction to Virtual Machines (VM) in Azure#
Overview
Teaching:
Exercises:
Questions:
How do I create my own computer in the cloud?
Objectives:
Navigate the Google Compute Engine service and terminology.
Allocate a virtual machine in Google Compute Engine.
Choose a machine type based on the application.
Use the cost estimator for Google Compute Engine.
Understand what a service account is and how they are used.
Learn how to connect to a virtual machine using ssh in the cloud shell with the web console.
Drew, after working with a Research Computing and Data (RCD) facilitator, has decided to start their cloud journey with compute to process data in the cloud with a Virtual Machine to do the analysis.
Azure Virtual Machines#
Before we begin this lesson, we need to create a ssh key pair so that we can securely login to the Virtual Machine (VM) we are about to create. We will need a ssh public key when we create the VM. If you have already created a key pair in the previous lession: Intro to Cloud Console then continue to step 2. If you have already copied the public key to your edit buffer then go to Create a VM.
Step 1.
The Cloud Shell should already be open from the previous lesson Intro to Cloud Console. If not, Open a Cloud Shell by clicking on the Cloud Shell icon in the right side of the top blue bar (the icon looks like box with a greater than sign followed by an underscore).
At the $ prompt in the Cloud Shell, enter ssh-keygen and follow the prompts.
$ssh-keygen
Generating public/private rsa key pair.
Enter file in which to save the key (/home/john/.ssh/id_rsa):
This prompt is asking you to create a .ssh directory in your home directory and generate ssh public/private keys named id_rsa.pub/id_rsa (default) respectively.
Press enter to continue to create the key. You will see another message asking you for a passphrase, similar to the following:
Generating public/private rsa key pair. Enter passphrase (empty for no passphrase): Here you should enter a passphrase (a series of words) to protect the key. You will be asked to re-enter the passphrase as shown below:
Enter same passphrase again: After successfully retyping the passphrase the key generation process will continue showing a similar message as follows (the fingerprint and art will look different):
Your identification has been saved in /home/<username>/.ssh/id_rsa.
Your public key has been saved in /home/<username>/.ssh/id_rsa.pub.
The key fingerprint is:
SHA256:D9yj1nZEUigahirvjkIFoCP7RfjDu67Ku88M7nHQftI learner@cs-748001990186-default-boost-r9phq
The key's randomart image is:
+---[RSA 2048]----+
|o    .     ..    |
|.. .. o . ..     |
|+ o... o .. .    |
|ooo=  .. . o     |
|.+..=   S o .    |
| o+..o   = o     |
|.+.+.E  o + .    |
|+.B o. . . .     |
|=O**o            |
+----[SHA256]-----+
The ssh key generation is now complete. You will only need to do this once for your account. Next, you will need to Cut (copy) and later Paste the public key during the VM creation process.
Step 2.
To Cut (copy) your public key, run the following command.
cat /home/<user-account>/.ssh/id_rsa.pub
Highlight the output string with your cursor starting with ssh-rsa until the end of the string (white test) and before you come to the green command prompt. With the public key highlighted, use the copy command (depending on OS) to put it in your edit buffer (i.e. for mac use command c).
Create a VM#
From the hamburger menu in the upper left of the top blue bar, click Virtual Machines. On the Virtual machines
page click Create (+) on the menu in upper left of the page. Choose Virtual machines.
In the middle of the page under the “Create Virtual Machine” heading there are menu options from left to right:
Basic, Disk, Networking, Management, Advanced, Tags, Review & Create. We will start with the Basic tab (default).
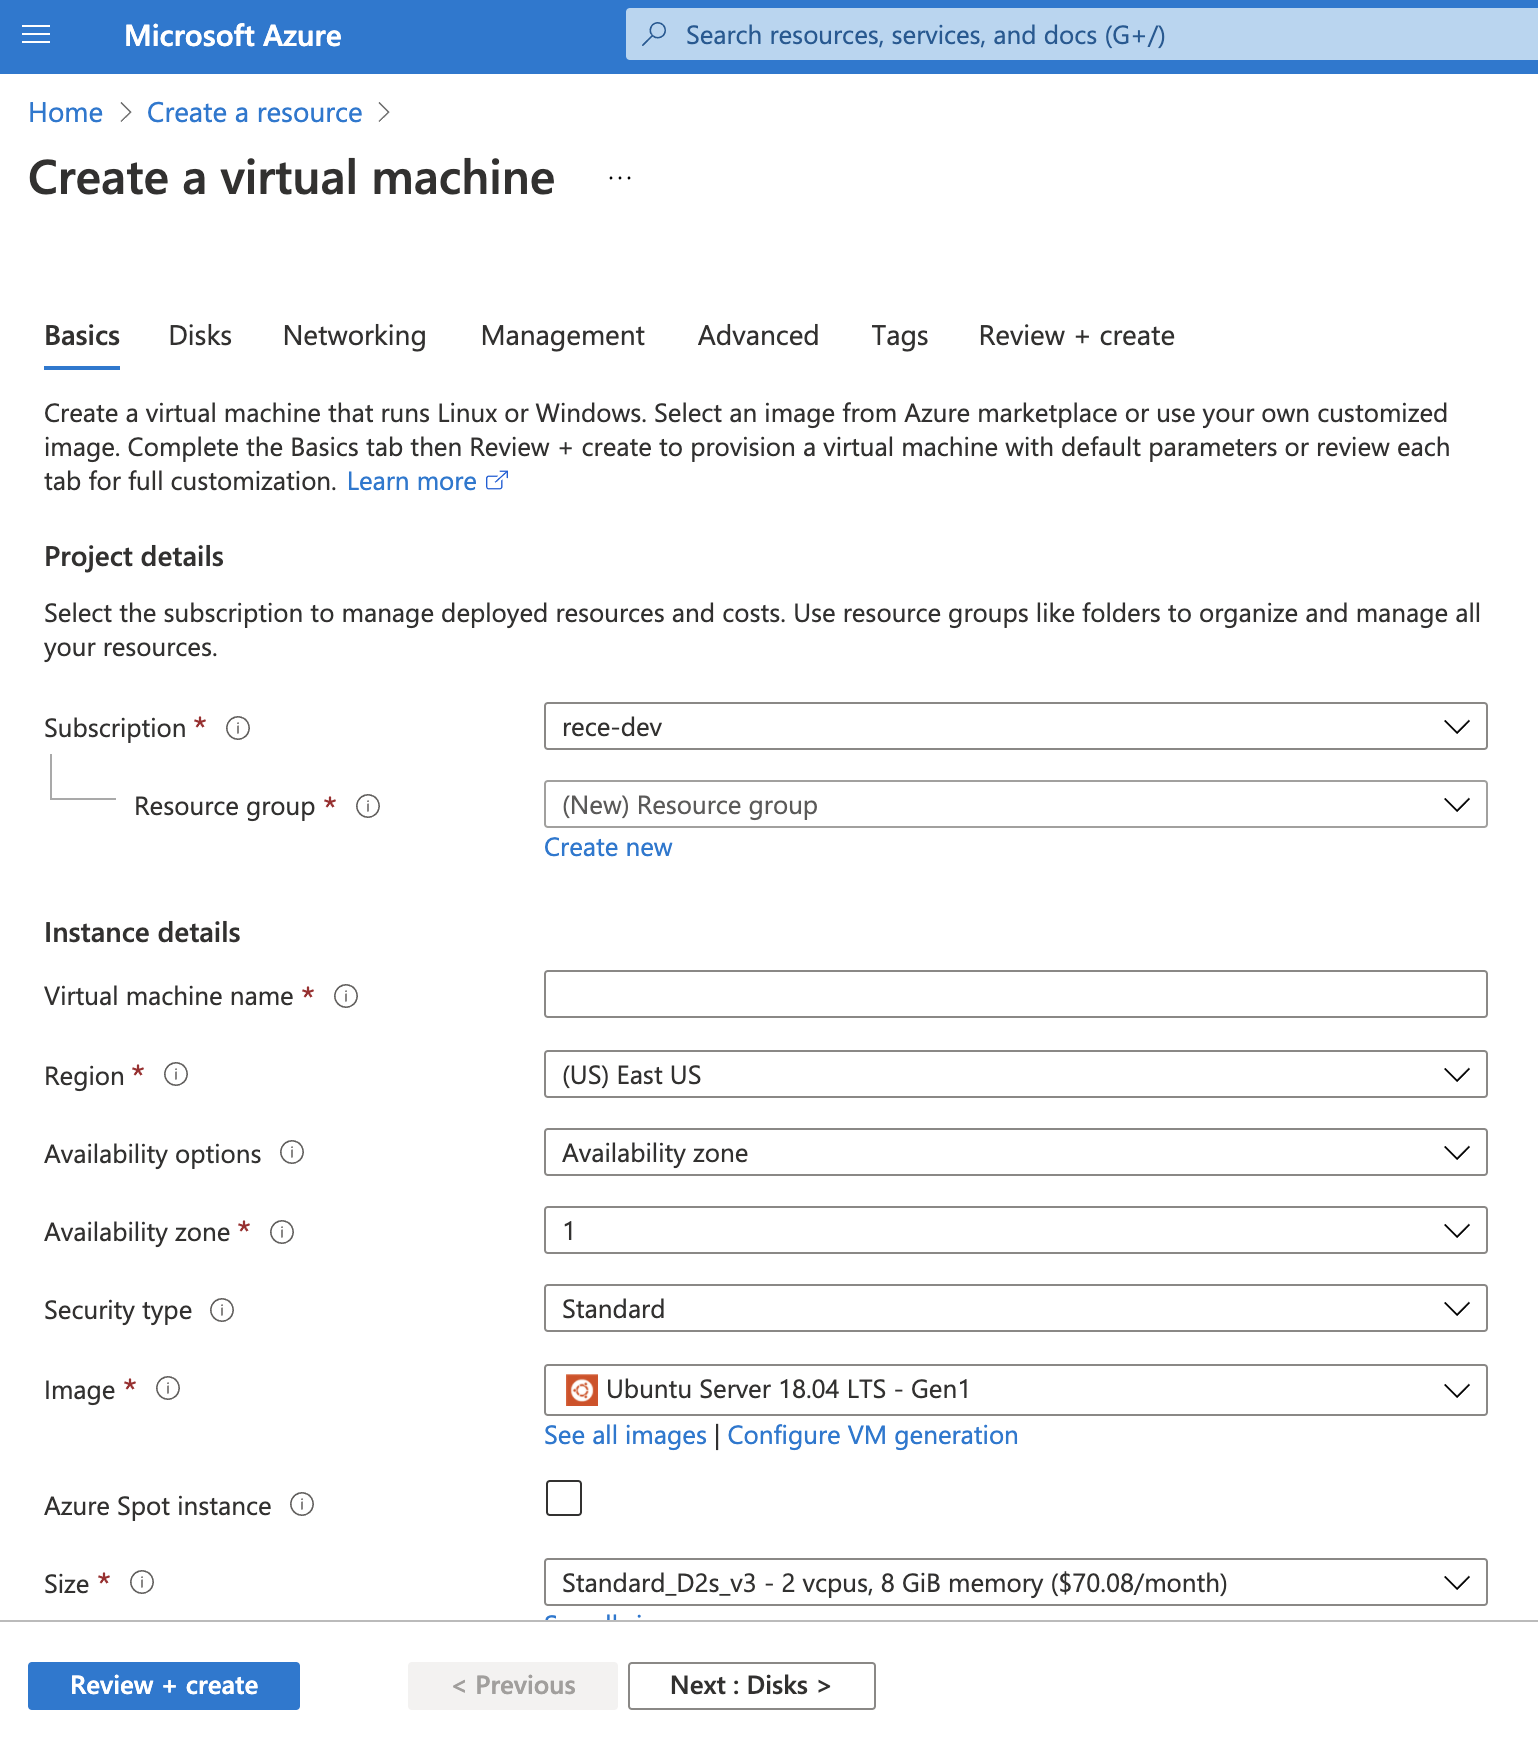
Part 1
Under the Basic tab (default)
Check subscription
Use the pull down menu to change subscriptions if needed
select or create Resource Group
Click the create a new Resource Group and enter a name that conforms to the azure naming convention (only alphanumeric characters, periods, underscores, hyphens, and parenthesis and can not end in a period)
Virtual machine name
Enter a name that does not contain special characters including blah or begin _ or end with . or -
Image
Use default image (Ubuntu 20.04 - Gen2)
Size
Standard_D2s_v3 (default)
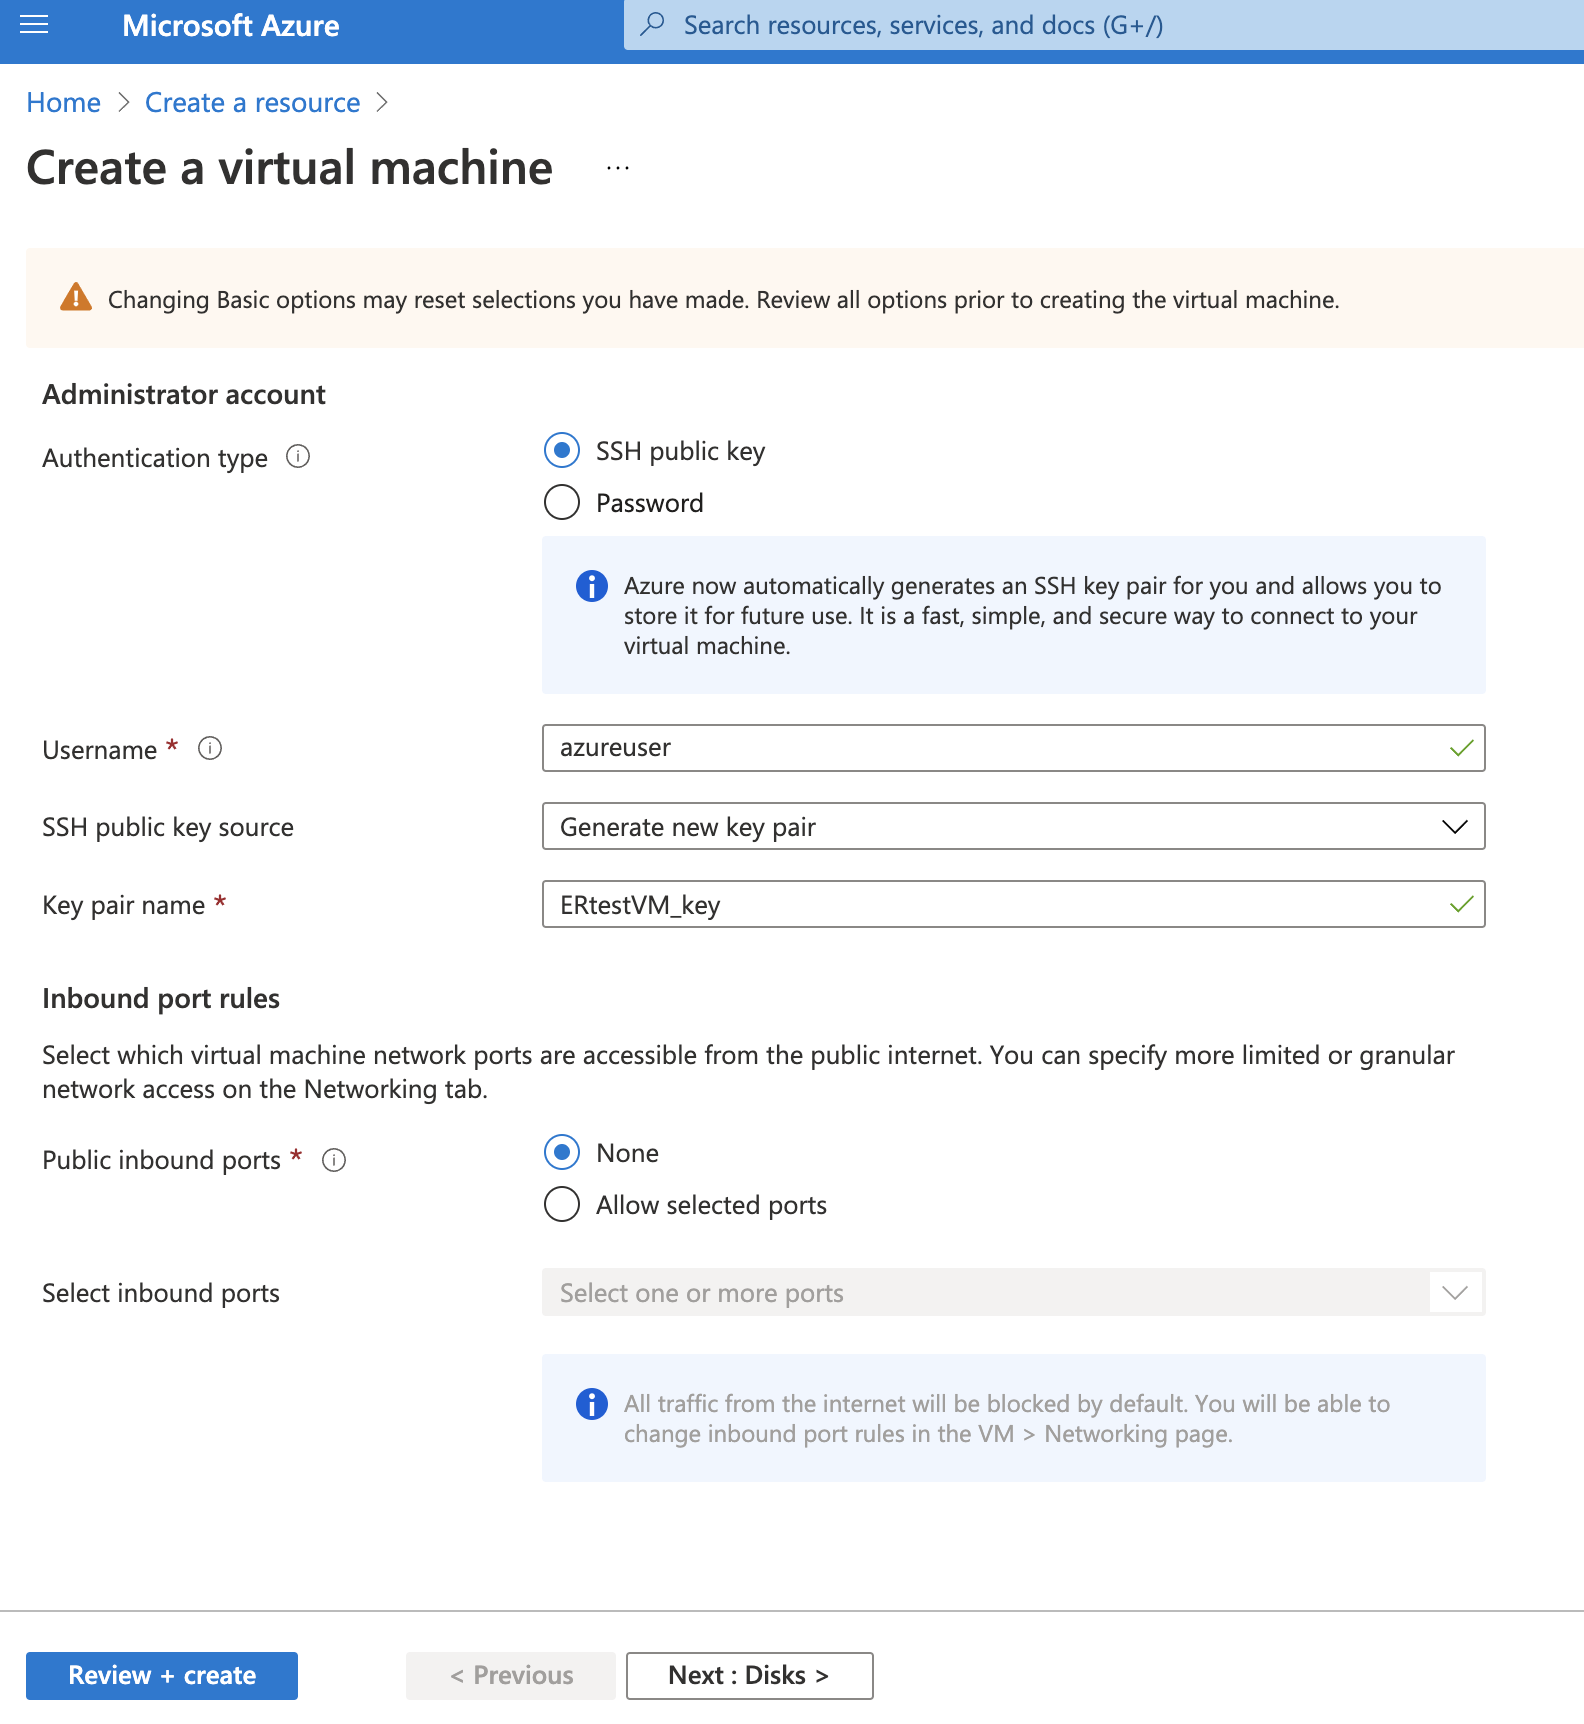
Part 2
Authentication type
ssh public key
Username
Choose usename (default: azeruser)
SSH public key source
Select use existing public key
Use the key we create and Cut (copied) earlier, paste (depending on OS) it into the red box below (i.e for mac use command v).
Key pair name
Choose name for key pair (default: auto generated based on VM name)
Public inbound ports
Select Allow selected ports (default)
Select inbound ports
Select SSH (22) from the pull down menu (default)
Now let’s continue to the disk configuration by clicking Next:Disk> on the bottum or on the top heading menu choose the Disk option.
Disk
OS Disk type
Leave as default
Encryption type
Leave as default
Data disk (create or attach)
Leave as default
Now let’s continue to the networking configuration by clicking Next:Networking> on the bottum or on the top heading menu choose the Networking option.
Networking
Virtual network name
Public IP
None
NIC network security group
None
Public inbound port(s)
Allow selected port
Select inbound port(s)
Use 22 for ssh access
Delete public IP and NIC when VM is deleted
Check this box
Now let’s continue to provision the VM. The next three menu options across the top are outside the scope of this tutorial so now we are ready to click Review & Create.
Management
Outside of scope
Advanced
Outside of scope
Tags
Outside of scope
Review & Create
Click Review & Create
After review you should have a green check indicating a successful validation
Check parameters for correctness
Click create
When the VM is provisioned we can verify that the VM was created.
Verify deployment
Click the hamburger in the upper left
Choose Virtual Machines
You should see your VM name
Click on VM name to get more information about your VM
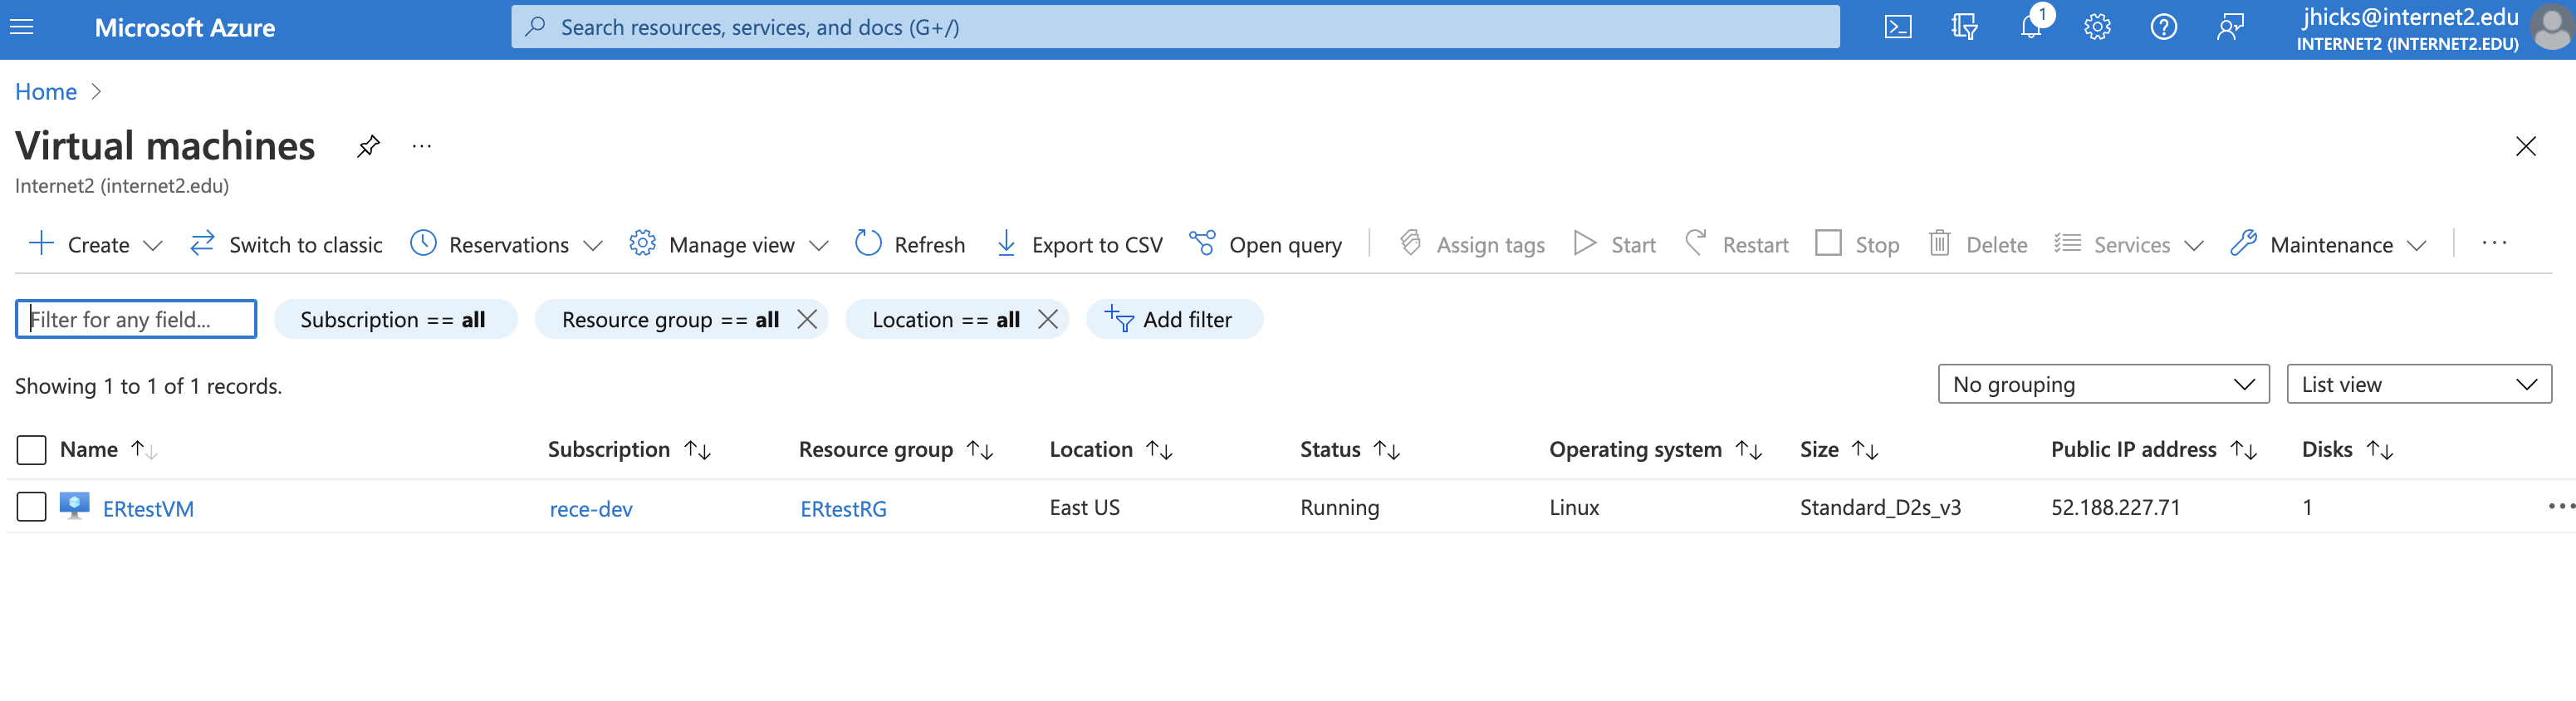
You will be looking at the overview page. The Overview page contains essential information like OS, public IP, RG, status, subscriptioin as well as other properties and information. Find and record the Public IP address.
Connect to the VM Instance#
To connect to the VM Instance we will use the cloud shell in the web console. Open up a shell by clicking on the Activate Cloud Shell icon (on the top blue bar click button the looks like a box with a greater than sign followed by an underscore) in the top blue bar if it is not already open. In Cloud Shell ssh to the VM you just created. (default username “azureuser”)
ssh <username>@<Public IP address>
If this is your first time logging in, you will be prompted with The authenticity of host ‘IP’ can’t be established. Type ‘yes’ and this will add the host to the ~/.ssh/*know_hosts file. After doing this once you will not be prompted again (unless the host key changes or the host is removed from the ~/.ssh/know_hosts file.
ssh azureuser@52.168.77.0
The authenticity of host '52.168.77.0 (52.168.77.0)' can't be established.
ECDSA key fingerprint is SHA256:F/3poSNTVVNbfSp3Kc7zBGwiGzt3qwrmjiyfI1ZHnX4.
Are you sure you want to continue connecting (yes/no)?
Clean up#
To complete the resource life-cycle we simply delete the VM created in this lesson. This will leave you with a Resource Group that can be used again for additional services.
To delete the VM:
In the Azure portal, navigate to the list of VMs in your Resource Group.
Select the VM to delete.
Select the More button (…), and select Delete.
Confirm that you want to delete the VM.
Delete the Resource Group (optional)
In the Azure portal, navigate to the Resource Group blade/button.
Select the Resource Group to delete.
Click delete
A warning will ask you to enter the name of the Resource Group to make sure you want to continue with this perminent operation.
Confirm that you want ot delete the Resouce Group.
Note: By deleting the Resource Group you will delete all services under it.